Scan Old Photos – And How to DIY
We all have cherished family albums that we’d like to preserve and share – but lack the time or skills to scan old photos. This how-to guide can help.

Most of us have hundreds of old photos tucked away—loose prints, albums, or framed pictures. These are reminders of our lives, slowly fading away. If you are lucky, you might have their negatives, but often not. Photos and film deteriorate over time, and once they’re lost, they’re gone forever.
So why should you scan old photos now?
Why Scan Old Photos?
1. To Give Your Past A Future
Old photographs are more than just pictures. They’re memories, milestones, and a visual record of your family’s story. Scanning them (and backing them up) ensures they’ll be around for future generations.
2. To Complete Your Collection
Family photos are typically distributed across siblings and relatives. Scanning and pooling everyone’s collections lets you create a complete digital archive that everyone can access and enjoy.
3. To Share Rare Photos With Family
Some photos may exist as a single print. High-quality scans make it easy to reprint and share those once-in-a-lifetime, cherished moments with others.
4. To Restore Damaged or Faded Prints
Time can take its toll—photos fade, get scratched, or stained. Scanned images can be digitally restored to look as good as new (or even better).
5. To Save Space and Reduce Clutter
As people downsize or declutter, bulky photo albums and shoeboxes full of prints can be hard to keep. Digital copies are easy to store and organize, taking up virtually no physical space.
The good news: It is really easy to scan old photos, and there are several ways to do it.
Your Scanning Options
1. DIY with a Scanner
If you have a flatbed or feeder-type scanner, you can do it yourself. Flatbeds are affordable and great for quality, while feeder scanners are faster but work only for loose prints.
2. DIY with a Mobile App
Apps like Pic Scanner Gold (iOS) make scanning easy and fast. Just point, shoot, and let the app do the cropping and enhancement. Until a few years ago, people scoffed at smartphone scanning, but current iPhone cameras are so good, that you don’t need to worry – dive straight in.
3. DIY with a DSLR Camera
A DSLR camera can give you high-resolution, professional quality scans—ideal for archiving or large reprints. You’ll need a tripod and a source of indirect or diffused light. This takes a bit more effort, but offers great results. You can even scan slides and negatives this way.

4. Outsource to a Professional
Short on time or have a large collection? You might like to consider a scanning service. You’ll need to sort and ship your photos, but they’ll handle the rest—scanning, organizing, and delivering digital copies on a USB drive, DVD, or cloud storage. Costs around $0.40-0.50 per photo (more for album pages and restoration), and they can even scan negatives and convert them to digital images. Of course there’s a bit of risk in shipping and trusting someone else with your precious, one-of-a-kind originals.
The Easy Way to Do It
- Start small. Sort and select photos. Shortlist a couple of hundred for the first phase.
- Scan photos using a flatbed scanner or a digital or smartphone camera. With scanner, scan up to four loose photos or one album page at a time. With camera, scan one or two photos at a time – otherwise the resolution will suffer. Save the scans in a folder on your Mac.
- Crop and save photos. Doing it manually will take ages, so get SnipTag – an inexpensive macOS app that automates this tedious task. Submit 20-25 scans at a time to the app. You’ll be amazed how fast all the photos get cropped and saved individually.
- Edit the photos’ creation dates. By default, scanned photos show when you scanned them – not when they were originally taken. Switch to the Tag mode in SnipTag, click open a photo, and add the correct date. Also consider adding the location and a short description. You can also do this in batch mode – e.g. if you have 20 photos, all taken on the same date and at the same place. Select them all and change their metadata simultaneously.
- Transfer the scans to a folder on your computer. As a result of your editing the EXIF dates, the photos will be sorted in the correct chronological sequence in the folder, and also when you view them with any program on any computer.
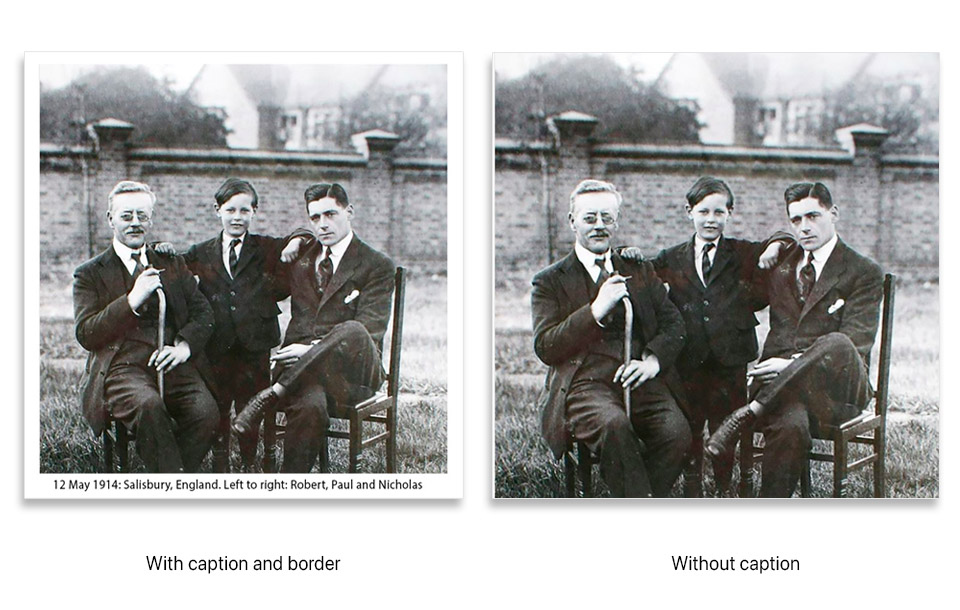
When exporting, SnipTag also gives you the option to imprint captions under the photos, as shown below. This is the digital equivalent of writing behind printed photos!
Congratulations – you have scanned the first batch, now repeat with more photos. Don’t forget to back up the exported scans on an external drive or a cloud storage service.