How to Scan Photos: A Simple Guide to Preserve Your Memories

You probably have a stash of old photo albums lurking somewhere—but scanning them isn’t on your radar, because it seems too time-consuming or technical. Don’t worry—this easy step-by-step guide will show you how easy it is to scan photos, preserve your family history, and create a digital archive that you can enjoy, and your future generations can cherish.
Why You Should Scan Your Old Photos Now
The precious memories of your life and loved ones in the pre-digital era are slowly fading, and unless you take action now, they could be lost forever. Here’s why it’s worth digitizing your photos:
1. Preserve Your Family History
Old photographs are more than images—they’re memories, milestones, and a visual family tree. Scanning them ensures they’ll survive for generations to come.
2. Create a Shared Digital Archive
Photos are often scattered across siblings and relatives. By digitizing everyone’s collections, you can build a centralized, shareable family photo library.
3. Reprint and Share Rare Photos
Many old photos exist as single prints. High-resolution scans make it easy to reprint, share, and enjoy these irreplaceable moments.
4. Restore Damaged or Faded Prints
Time, humidity, and light can damage photos. Once scanned, images can be digitally enhanced and restored—sometimes looking even better than the original.
5. Save Space and Declutter
Downsizing or decluttering? Bulky albums and boxes take up space. Digital copies are easy to organize and store, with no physical clutter.
Why People Put Off Scanning Photos
Let’s be honest—scanning sounds like a daunting project. People often delay it because they feel they lack:
- Time or motivation
- Technical skills
- Scanning equipment
- Budget for professional services
The good news? Scanning photos is easier than you think—and you have multiple options depending on your needs and budget.
4 Ways to Scan Old Photos
1. Use a Flatbed or Feeder Scanner
A flatbed scanner offers excellent image quality and is perfect for prints and photo albums. Feeder scanners are faster but only work with loose prints. Most models today are plug-and-play and come with simple editing tools.
2. Use a Photo Scanning App
Apps like Pic Scanner Gold (iOS) and Google PhotoScan (Android) make scanning super easy. Just point and shoot—these apps auto-crop and enhance your photos. With current iPhone cameras capable of capturing 12-42 MP, you can get pretty high resolution scans.
3. Use a DSLR or Mirrorless Camera
Want professional-quality scans? A good DSLR or mirrorless camera can deliver stunning results. Set up a basic rig to get high-resolution images perfect for archiving or large reprints. You can even digitize negatives using this method.
4. Use a Professional Photo Scanning Service
If you’re short on time or have a large collection, you could outsource. Services scan, organize, and deliver digital files via USB, DVD, or cloud. Prices start around $0.50 per photo. They scan loose prints as well as negatives—but often not albums—and be aware of the risks involved in shipping originals.
The Easy Way to Start Scanning
You don’t have to do it all at once. Start small and follow these simple steps:
Step 1: Sort and Select
Choose a few hundred key photos to scan first—family milestones, heirloom pictures, or important events.
Step 2: Scan the Photos
Use a flatbed scanner, smartphone app, or camera. A scanner can process up to four prints or one album page at a time. With a camera or phone, scan one or two photos at a time for the best resolution.
Step 3: Crop and Save with SnipTag
Cropping photos manually is tedious. Use SnipTag, a Mac app that automatically detects and crops individual photos from scanned images. Just drag and drop 30–40 scans at a time into the app’s “Snip” pane, and they are cropped. It’s fast, accurate, and a huge time-saver.
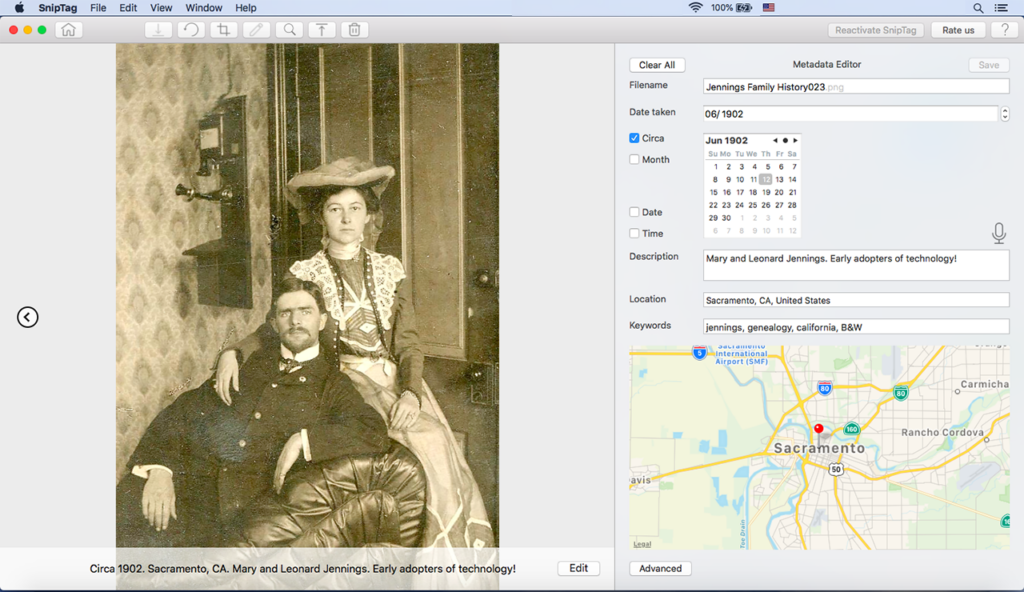
Step 4: Add Dates, Locations, and Captions
Scanned photos usually show the scan date—not when they were taken. Use SnipTag’s “Tag” mode to add the original date, location, and a brief caption. You can even edit metadata in batch mode—for example, tag 20 wedding photos all at once.
Step 5: Export in Chronological Order
Export the edited photos to a folder on your computer. Because you’ve updated their EXIF data, they’ll appear in the correct order in any photo viewer or gallery.
SnipTag also lets you imprint captions below the photos, which is a great way to preserve context and family stories.
Final Tips: Backup and Repeat
Once you’ve scanned your first batch, back everything up—to an external hard drive and cloud storage (Google Drive, iCloud, Dropbox, etc.). Then continue with the next set of photos.
Ready to Preserve Your Photo Legacy?
Digitizing your photo collection doesn’t have to be overwhelming. With the right tools and a bit of planning, you can preserve your family’s visual history—and enjoy sharing it for years to come.