SnipTag app for Mac – Frequently Asked Questions (FAQ)
SnipTag FAQ is a compilation of users’ questions. If you have a question that isn’t answered here, click Help > Contact in the app for prompt assistance. We may also add your question to SnipTag FAQ so it can help others.
This document contains the following sections:
- Getting Started
- Batch Cropping Scanned Photos
- Adding Captions and Metadata
- Exporting Photos to Mac or Cloud
- Subscription and Purchase
- Other Topics
GETTING STARTED
1. I have downloaded SnipTag. How do I start using the app?
Launch SnipTag. Select either Use Free, or Quarterly / Yearly subscription or One-Time fee option. On on the Home screen, click Help > User Guide (read or print) to learn how to use the app.
2. What is the Use Free option?
This option lets you try out the app before subscribing or buying. This mode allows unlimited import of scans for cropping and photos for metadata editing. You can also use the metadata viewer and Photo Finder. There is no time limit for this free trial, but exports are limited to 2 photos a day. You can unlock unlimited batch-exports any time via subscription or purchase.
3. How to print the User Guide?
In the top toolbar, select Help > User guide. Click File > Print.
4. Trying to download (or reinstall) SnipTag from the App Store but can’t, the spinner keeps turning interminably.
Sign out of the App Store, reboot the Mac, launch App Store, sign in again.
5. On launching the app, the screen shows two empty panes. What now?
You are in Snip mode, which is for cropping scanned photos. You can either import scans (Click the red button and read the scanning tips first) or use the test scans we have provided (Click the black button).
To import photos to add captions and metadata, switch to Tag mode by using the Snip / Tag selector neat top left. This mode has one pane.
Read the User Guide for more details.
BATCH CROPPING SCANNED PHOTOS
1. How to crop scanned photos with SnipTag?
Please use a scanner, phone or digital camera to scan one or more photos per shot, then use SnipTag to batch-crop them. Scan as explained in this very important tutorial, and save the scans on your Mac. Launch SnipTag in Snip mode, and import the entire batch in the left pane. All the photos will be automatically detected and extracted.

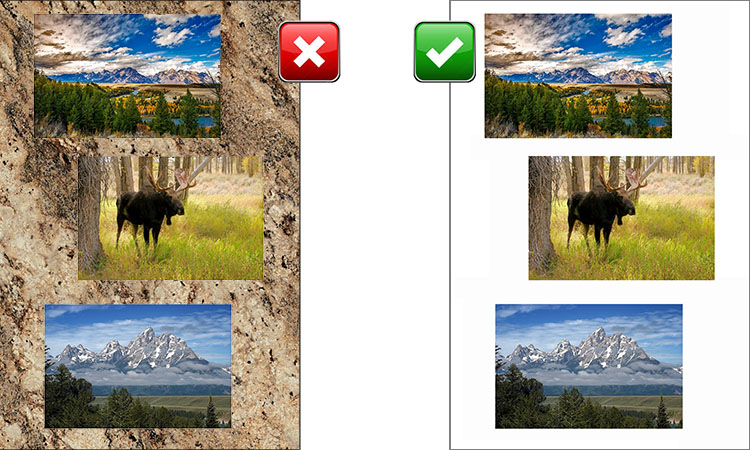
2. Do photos have to be placed on a white background for scanning? My photos are glued into an album with black pages.
No, you can scan photos having any solid color background. There should be some contrast between the photos’ edges and the background, that’s all. The background shouldn’t be multi-color or patterned.
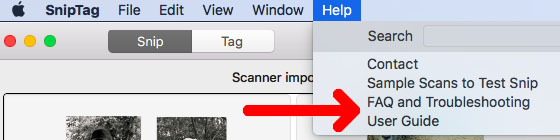
3. I followed the scanning guidelines from the User Guide, yet some photos were cropped inaccurately. What to do?
If this happens, do one of the following two things:
- Click File > Preferences > Cropping Engine > Change Apple Vision to Computer Vision, or vice versa. Now re-import the scan, and see if it’s cropped correctly.
- Double-click the scan in Scanner Imports pane > Click Crop button in top toolbar > Manually crop the wrongly cropped or missing photo.
If cropping is still wrong, email us the scan. We’ll tell you what to do.
4. The toolbar button (or menu option) that I want to use is greyed out.
The functions that are not available are greyed out. For example, if editing tools are disabled, you must first select photo(s) to enable the tools.
5. I can’t import photos for cropping. The screen only has one pane.
This means that you are in Tag mode. Use Snip/Tag selector to switch to Snip mode. You’ll then see two panes. Import photos into the left pane.
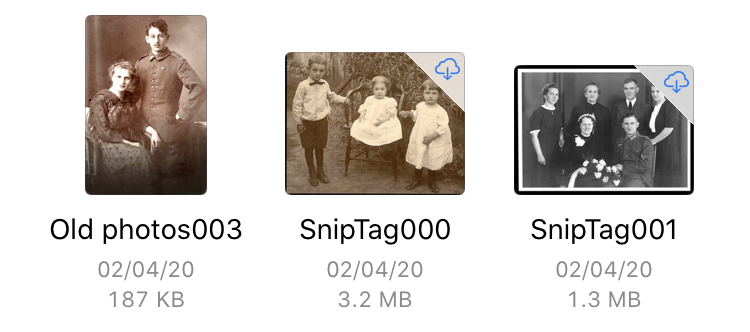
6. Trying to import a photo from Mac desktop, but nothing happens.
See if the file has a ‘cloud with downward arrow’ symbol next to it. If yes, the file is in iCloud. You must download it to your Mac before importing into SnipTag. If there is no cloud symbol, it may be an invalid file type, i.e. not an image file. SnipTag only crops images.
7. I imported a photo, but its filename got truncated. Why?
SnipTag accepts max 56 character filenames, which is quite adequate. If your file name is long because it comprises details about the photo, the correct place to save this information is the metadata Description field.
8. I cropped some scans, and they were numbered serially 001, 002 etc. But on exporting them, the numbers changed to 001 2, 002 2 etc. Why?
If you already have photos with the exact same names as the photos being exported, SnipTag will add 02 to file name to prevent older files from being overwritten. To avoid this, export the scans into a separate folder.
9. My scans are a bit off perpendicular. How to straighten them?
SnipTag only has a basic cropping tool, but we plan to enhance it to provide crop-and-straighten functionality. For the time being, please export cropped / metadata edited photos to your regular photo program for editing.
ADDING CAPTIONS AND METADATA
1. What do I gain by adding metadata to digital photos?
As your photo library grows, it gets harder to find specific photos and recall when and where you took them, what was the occasion and who’s in them. Metadata preserves these details and lets you retrieve photos easily.
Professional photographers can use metadata to assert their intellectual property rights by embedding copyright details into the images. They can also add contact details so customers can find them. Learn more here.
2. What is the difference between captions and metadata?
Captions are visible, metadata is invisible. When you input the date, place and description for a photo, this information appears as a visible caption below the photo. You can also print it below the photo while exporting. SnipTag also saves these details, as well as many other optional details as metadata tags. The tags stay embedded in the photos even when you export them, and are useful when searching for specific photos.
3. How to add captions and metadata to photos?
Open the app in Tag mode. Select one or more photos. Click Caption button (see below) in the top toolbar. The captions and metadata editor will open.

4. I amended Date Created, but on exporting, the photos shows the current date in Finder – not what I had input.
Don’t worry, your metadata is intact. Finder doesn’t show EXIF or IPTC Date. To view metadata correctly, please use Photos for Mac app, or https://exifinfo.org.
5. I cannot drag and drop photos into the app for editing metadata.
If you see two panes on the screen, you are in Snip mode. In this mode, you can only import photos into the left pane for cropping. If you don’t want to crop but add metadata, switch to Tag mode first and then import.
6. How to rename multiple photos, changing Sniptag to something else?
Select the photos; click the pencil button in top toolbar; replace SnipTag with your preferred filename, and save. This will apply the same prefix to all selected photos and retain the suffix sequence #s as before
7. I want to rename photos but can’t type anything into Filename field.
SnipTag displays file names as: file name + 3 digits or letters + file format. Select only the file name; you will be able to over-type the new name. Don’t highlight the trailing digits/letters or file format. See below:

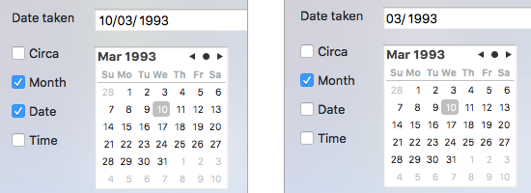
8. I don’t know exactly when the photo was taken. How to input only the year or only year and month?
The default IPTC format is date-month-year-time. To skip time and date, deselect these boxes in metadata editor (See below). To input only the year, also uncheck Month. To save only the approx. year, check Circa. Note that on deselecting Month or selecting Circa, Date taken still shows MM / YYYY, but click Save, and the caption below the photo will show only the year.
Because IPTC standards require DD and MM to also be filled when you fill YYYY, the metadata Date/Time Taken field will default to current date, time and month unless you change anything.
9. What is time offset, and how do I apply it to a batch of photos?
If you took photos with a camera with a wrong date setting, you may want to shift the date and time stamped on all the photos by the same amount. This is called time offset. This can be done with Photos for Mac app, so we have not duplicated the time offset feature in SnipTag. [1]
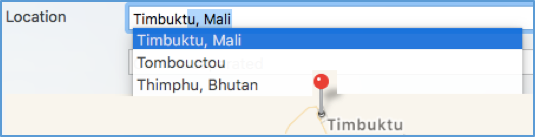
10. I’m typing an address into Location field but finding no matches?
Start by typing the city name, then country, then street name. Every keystroke will reveal different options. Type until you see the desired or most appropriate one.
11. How to tag people by faces?
This can be done in Photos app but not in SnipTag. This is because (unlike dates, descriptions, locations etc.), there is no industry-standard convention for face tagging. That’s why you lose all face-tagging info when you export photos e.g. from Photos for Mac to desktop or any other photo program.
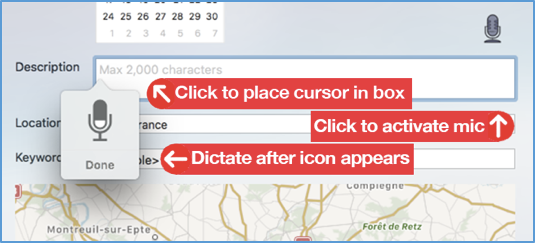
12. Dictation works sometimes and doesn’t at other times. What to do?
Dictation facility is primarily for Description, which require a lot of typing. Avoid dictating File name, Date and Location. First position the cursor by clicking into the field (See below), then click Microphone icon. Wait until you hear the Mic activation ‘ding’ sound, then dictate. Speak slowly and enunciate clearly.
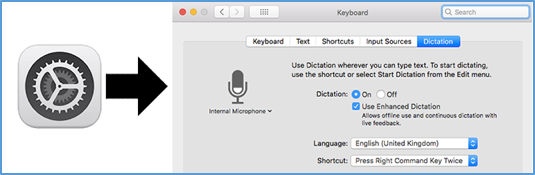
13. Dictation works, but the text transcription is inaccurate.
Speak slowly, loudly and clearly. See https://support.apple.com/en-us/HT202584. Also, check your language selection in System Preferences (See below):
14. How to shorten the caption imprinted below the photo?
In Metadata Editor, click Edit button next to the caption. Edit as you want, then click Save. This won’t affect the long Description you’ve written.
15. I exported pictures to Photos for Mac, and my metadata was still there. But after uploading to my website, it disappeared. Why?
Many web hosting services strip metadata to reduce file sizes, speed up loading or to protect privacy. Facebook, other social networks and messaging services also remove metadata. But if you save photos in your Mac, thumb drive, external drive, cloud service, or Flickr, Google Photos etc., the metadata will stay intact.
16. How to exclude Date and/or Location from Captions?
Click SnipTag > Preferences > uncheck the Date and/or Time check boxes.
17. I added metadata in a PNG file. IPTC and XMP metadata have been saved but not EXIF. Why?
Because PNG format does not support EXIF.
EXPORTING PHOTOS TO MAC OR CLOUD
1. Will metadata stay embedded after exporting photos out of SnipTag?
Yes, metadata stays embedded in the photos. You can see this at exifinfo.org or in another program (Not Finder – it doesn’t follow EXIF / IPTC standards).
2. Will image resolution be reduced on export? Can I reduce a 300 PPI image to 72 PPI if I want?
No. SnipTag exports all photos in the original resolution. If you imported a 300PPI scan or photos, it’ll remain 300PPI after export.
SUBSCRIPTION AND PURCHASE
1. Trying to purchase a subscription. Getting error.
Check that you are logged in to the App Store using your Apple ID, and have a valid payment method linked to that ID. If both these things are in order, it’s probably the App Store acting up. Try this trick: Click on the App Store’s ‘Purchased’ tab. If any of the apps you’ve downloaded needs updating, do so – then try purchasing SnipTag’s subscription. Usually this hack works.
2. Can I try the app before buying? Which pricing option is best for me?
Yes, the Use Free option allows you to experience all of SnipTag’s features. The only restriction (on exports – See Getting Started, Q2 above) can be removed by subscribing or purchasing, as explained below:
For a one-time project or experiencing the app before making a long term commitment, quarterly subscription is an inexpensive option. Use yearly subscription or one-time price options if you plan to use the app for a longer project or an ongoing basis.
3. My subscription is current, but I deleted the app. What to do?
Re-download SnipTag from the App Store. You won’t be charged again, and your subscription will continue (Can check via SnipTag > Preferences).
4. My subscription is current (or I paid one-time price), but the app won’t let me export photos and asks me to renew subscription.
Click ‘Restore’ button on top right of the Home screen. If your subscription or purchase is in order, your privileges will be restored.
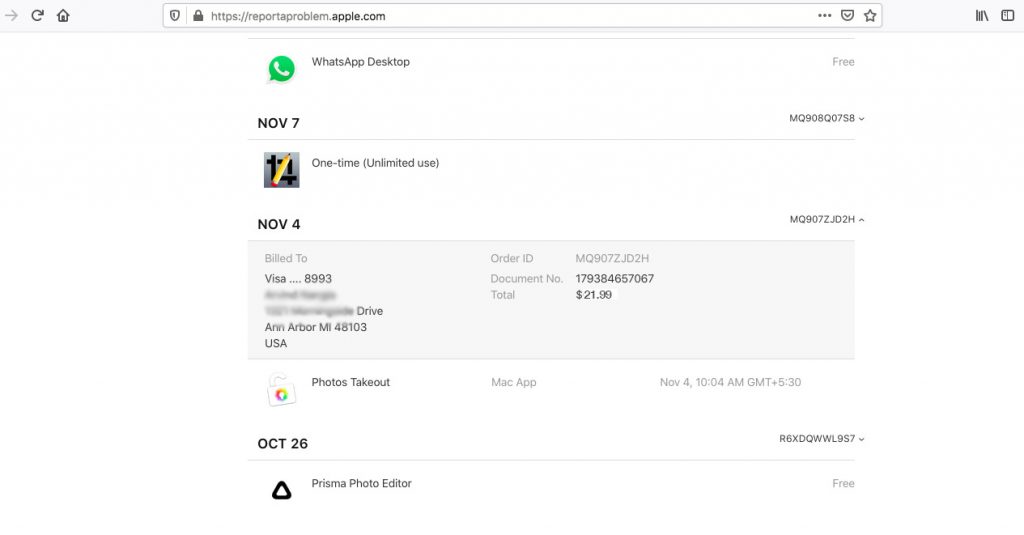
If the issue is still unresolved, please go to reportaproblem.apple.com > find SnipTag in the list of apps > click on the purchase code to expand the view (MQ907ZJD2H in the screenshot below) > take a screenshot of the expanded record for SnipTag). We’ll then assist further.
5. How to change or cancel auto-renewing subscription?
On Mac, open the App Store app. Go to Account Information > Manage > Subscriptions > Manage. Click Edit to the right of SnipTag, and make the desired changes. For detailed guidance, see https://support.apple.com/en-us/HT202039.
6. What if my subscription lapses and I don’t renew it?
Your privileges will revert to Use Free mode. You’ll still be able to import photos, crop and caption, but will only be able to export two photos a day. Since your photo collection is always growing, it’s worthwhile keeping your subscription current – it’s inexpensive and useful.
7. My subscription lapsed two months ago. If I buy a quarterly subscription now, will it last for three months or one?
Subscriptions run for the full duration from the date of purchase or renewal. So a quarterly subscription will last for three months, yearly for twelve months.
SNIPTAG FAQ – OTHER
1. Unexpected behavior e.g. cannot select, rotate, import or export photos, the app crashes, doesn’t recognize your subscription, etc.
Click SnipTag > Quit SnipTag. Relaunch and see if normal functioning is restored. If the problem persists, please email us full details (which screen, what happens/doesn’t happen, model of Mac, MacOS version, app version, screen shots) so we can find and resolve the issue.
2. I got my computer repaired and photos are gone!
SnipTag data is stored on your hard disk. As a result, erasing SnipTag or the disk will permanently erase the data. Therefore, it’s important to back up photos regularly in iCloud, Dropbox, external drive or thumb drive.
3. Can I get a printable PDF of the SnipTag FAQ document?
Of course. Please email us through the app, mentioning SnipTag FAQ in the subject line, so that we can send it to you.
4. My question isn’t answered here.
Please email us through SnipTag (Click Help > Contact in the top toolbar), providing all the details. Attach a screenshot if it helps explain the issue. We’ll assist, and may also add your question to SnipTag FAQ document.